Thursday, December 15, 2011

The Virtual Cookie Swap!

Martha Stewart's Ultimate Chocolate Chip Cookie

This might be my new favorite day of the year!!!

The Epicurious blog reported that the virtual food world is holding a cookie recipe swap today!!!!!

Food web sites are sharing their favorite holiday recipes. I want to try all of these...especially any with chocolate

Below is the list of recipes in the swap. And let me add my favorite: Martha Stewart's Ultimate Chocolate Chip Cookie. I love it because it combines chocolate chips and chocolate chunks and always comes out wonderful and chewy!

What is your favorite cookie recipe? Post it here so we can start our own cookie swap!


Now for the list:

Websites Favorite Holiday Cookie Recipes:

Epicurious: Italian Almond Cookies
Gourmet Live: Pistachio Cranberry Icebox Cookies
All You Magazine: Pecan and Honey Diamonds
Oprah.com: Sugar Cookies
Gilt Taste: Momofuku Milk Bar's Holiday Cookie
Liquor.com: Drink in the Holidays
Cooking Light: Iced Sugar Cookies
MyRecipes.com: Ultimate Chocolate Chunk Cookies
Food52: Ginger Spiced Molasses Sugar Cookies
Cooking Channel: The White House's Molasses Spice Cookies "Gingersnaps"
BlogHer: Triple Chocolate Almond Cookies
CafeMom: Marvelous Mini Apple Crisp Cookies
The Daily Meal: Pumpkin Chocolate Chip Cookies
Food Republic: Gingerbread Cheesecake Cookies
EatingWell: 5 Tips for Perfect Gingerbread Cookies
Redbook Magazine: Candy Cane Cookies
AP/ J.M. Hirsch: Ginger Fig Crumb Bars
FOX News: White Chocolate Cherry Oatmeal Cookies
GMA.com: Brownie Cheesecake Peppermint Bars
Big Girls Small Kitchen: Cowboy Cookies
FN Dish: Peanut Butter-Chocolate Chip-Bacon Cookies
Yahoo! Shine: Nutmeg Rosettes
Food & Wine: Chocolate-Espresso Snowballs
YumSugar: Coconut Date Balls

Saturday, November 19, 2011

More To Thanksgiving Than Pumpkin Pie

Courtesy Martha Stewart
Our Thanksgiving hostess sent out an email a few weeks ago asking her guests to let her know what they plan to bring for the holiday.

Everyone likes to bring dessert, she said in her email, but and she wanted to avoid serving 20 apple pies and nothing else for dessert.

It might not seem like Thanksgiving without a traditional assortment of apple or pumpkin pies. But you can definitely wow your host, or your guests, with some fun and tasty fall surprises on the dessert table.

A few weeks ago Megan Olund at Dough Heads Bakery in Englewood, N.J. shared her pumpkin whoopie  pie recipe. My husband is addicted to these and we actually fight over them when I bring them home from the bakery. So they have my vote this year as the best alternative dessert for Thanksgiving.


But for something that involves a few less steps, I definitely recommend my old standby favorite: Martha Stewart's Pumpkin Doughnut Muffins. Before I discovered whoopie pies this was my go to recipe for a party.

They always got rave reviews. It probably has something to do with the last step: brushing the muffins with melted butter and rolling in cinnamon sugar.

So if you are still mulling over what to make for Thanksgiving dessert, break with tradition and add something a little different to the table.

Martha Stewart's Pumpin Doughnut Muffins

Ingredients:

10 tablespoons (1 1/4 sticks) unsalted butter at room temperature
3 cups all-purpose flour (spooned and leveled)
2 1/2 teaspoons baking powder
1/4 teaspoon baking soda
1 teaspoon coarse salt
1/2 teaspoon ground nutmeg
1/4 teaspoon ground allspice
1/3 cup buttermilk
1 1/4 cups pure pumpkin puree (from a 15-ounce can)
3/4 cup light brown sugar
2 large eggs

For The Sugar Coating:
1 1/2 cups granulated sugar
1 Tablespoon plus 2 teaspoons ground cinnamon
1 stick unsalted butter, melted

Directions

Preheat oven to 350 degrees. Butter and flour 12 standard muffin cups.

Make batter:

In a medium bowl, whisk together flour, baking powder, baking soda, salt, nutmeg, and allspice. In a small bowl, whisk together buttermilk and pumpkin puree. In a large bowl, using an electric mixer, beat butter and brown sugar until light and fluffy. Beat in eggs, one at a time, scraping down bowl as needed. With mixer on low, add flour mixture in three additions, alternating with two additions pumpkin mixture, and beat to combine.

Spoon 1/3 cup batter into each muffin cup and bake until a toothpick inserted in center of a muffin comes out clean, 30 minutes.

Meanwhile, in a medium bowl, combine granulated sugar and cinnamon. Let muffins cool 10 minutes in pan on a wire rack. Working with one at a time, remove muffins from pan, brush all over with butter, then toss to coat in sugar mixture. Let muffins cool completely on a wire rack.

Friday, November 4, 2011

Dough Heads Bakery

Megan Olund's Pumpkin Whoopie Pie
Sorry I haven't been writing lately, but I've been spending most of my weekends interning at Dough Heads Bakery  in Englewood.

Since I am still working during the week, it is a pretty hectic schedule.

But I feel lucky that I picked Dough Heads to spend my weekends and finish school, if I can't be at home catching up on some sleep.

I discovered the bakery after reading an article about it in The Record. Megan Olund, a French Culinary Institute graduate and former retail manager at Amy's Breads, opened Dough Heads in January with her partner Chris Heslin.

Some of my co-workers were already raving about the soup and quiche so I went to check it out and met Megan. The place instantly reminded me of the coffee shop my college roommate and I used to dream about opening during late night alcohol induced conversations. We would know all the customers and our friends would hold poetry readings and play music.

Wonderful deep chocolate brownies 
I was also quickly won over by the brownies, which are the best I've ever had. And for a serious chocolate addict like me, that says a lot. Megan revealed that her secret is unsweetened chocolate. I've also become a huge fan of the coconut melty bars and my parents rave about the cupcakes.

Chocolate cupcakes with raspberry frosting
Before I came along, Megan had been doing on the baking on her own while Chris ran the front of the store, greeting customers, making coffee and taking orders for birthday and wedding cakes. Chris and Megan are on a first name basis with most of their customers. I frequently hear them having long conversations when I am in the back scooping red velvet whoopie pies or cutting up croissants for bread pudding.

Chris at the counter helping a customer 

Megan making crumb cake in the kitchen
I was told that working in kitchens can be pretty grueling and I would have to develop a thick skin. That is why I feel like I lucked out finding Dough Heads. I think I'm learning a lot and Megan has been great to work for -  she has endless patience when I try to shape baguettes and they end up looking like a long snake that ate a mongoose. And she was very understanding when I didn't fill the eclairs enough on my first try. We had to hold each one upside down after they were covered in chocolate to add more filling. Somehow that ended with me getting to eat one of the barely filled eclairs, so I don't think I was in any trouble.

I'm probably responsible for the oddly shaped baguette on the left 
On Sunday mornings when customers from the neighborhood stream in for coffee, croissants and muffins I get a little jealous that there isn't such a place near my home. I would spend all my afternoons there drinking coffee, working on my lap top and eating sweets until my stomach hurt (which I sometimes get to do now under the excuse of "trying of the products").

Megan agreed to share her pumpkin whoopie pie recipe with me. I think it would make a perfect treat on the Thanksgiving dessert table, or anytime during the fall. And it seemed appropriate because Megan is from Maine, where the whoopie pie craze started.

Please stop by and visit! I'll be working in the back on weekends through the new year, and the bakery is open Tuesday-Sunday.

Dough Heads Pumpkin Whoopie Pies
 Courtesy of Megan Olund

1 stick butter
3/4 cup sugar
2 eggs
1 teaspoon vanilla
1/2 cup sour cream
1/2 cup oil
one 15 oz can pumpkin

3 cups all-purpose flour
2 teaspoons baking powder
1 teaspoon baking soda
1 teaspoon salt
1 1/2 tablespoons cinnamon
1 teaspoon ginger
1/2 t  cloves

In the bowl of an electric mixer fitted with a paddle attachment beat butter and sugar until its light and fluffy, nearly the consistency of sour cream. This can be left going on the mixer while you prepare the other ingredients.

Add eggs one at a time, scraping bowl in between additions. The vanilla can be added with the eggs.

In a separate bowl combine combine sour cream, oil and pumpkin. Stir to mix together. In a second bowl combine flour, baking powder, baking soda, salt and spices. Mix together to combine I usually just stir with my hand.

After adding eggs to the butter and sugar, alternately add wet and dry ingredients in three additions, starting and ending with dry. Keep mixer on low during this step and scrape down bowl in between additions.

Using a small ice scream scoop, about the size of a tablespoon and a half, scoop leveled whoopie pie halves onto a sheet pan lined with parchment paper. For easier scooping, first refrigerate the batter for at least half and hour.

Bake at 350 degrees for about 7 minutes, until the halves are golden and spring back when touched.

Makes 36 whoopie pies or 74 halves

Pumpkin whoopie pie filling:

1 pound of Marshmallow fluff
2 sticks butter butter
8 oz cream cheese
3 cups confectioners sugar

Beat butter and cream cheese in the bowl of a mixer fitted with a paddle attachment until combined.
Add in the confectioners sugar and beat until light then beat in the fluff.

To assemble:

Scoop a small amount of filling onto cooled whoopie pie half, top with another half and gently press together.

Wednesday, August 17, 2011

The one cookbook you can't live without?


One of my favorite blogs, Food52, recently posed the question:

If you could cook from one cookbook and one only...which would it be and why?

I'm totally stumped! Is it really possible to sift through my totally disorganized but sacred bookshelf, pick one cookbook, and just forget about all the others?

The cookbook I can't live without depends on my mood. If I have a whole lazy day at home I'm going to grab Jeffrey Hamelman's "Bread" book and make a few loaves to keep in the freezer so I can avoid store bought bread for a while. If I have time in the morning and want to make dinner, I am going to grab my Crock Pot cookbook published by Rival and pick a meal that will be waiting for us when we get home.

Not to mention my beloved binder filled with recipes I have clipped from cooking magazines over the years. That is one collection of recipes I couldn't live without, but in this case I am not sure it counts.

If I was forced to grab one cookbook from my shelves and toss aside all the rest I think it would have to be "The New Jewish Holiday Cookbook" by Gloria Kaufer Greene.


This cookbook has won me years of praise at family holiday dinners. It's filled with wonderful recipes from around the world. My picky mother who avoids anything "ethnic" because she thinks its spicy doesn't know it, but every Rosh Hashanah she raves about a Moroccan dish (chicken braised in honey and tomatoes) that I make from this cookbook. I love this book because I love cooking for the holidays and having our entire extended family gathered around the dinner table.

So now I ask you the same question: If you could pick one cookbook to cook from- and only one - what would it be and why?


Thursday, July 7, 2011

Summertime!

Mint Chocolate Ice Cream Cake
The burning question right now is what I am going to do when I am done with culinary school.

This fall I will be an intern - hopefully in some wonderful New York City bakery - and I'll get to keep learning. That is the part I am excited about. After that I really want to start developing my own recipes. And I might start telling all of my neighbors that they should think of me the next time they need a cake for a special occasion.

A friend suggested that I start writing about easy dinners for working couples. I don't think I am destined to be the next Rachel Ray with a cookbook of 30 minute meals. But maybe my friend was onto something and I I should try to capitalize on what I love to do most: quick and easy desserts that look impressive, but take little effort.

This mint chocolate ice cream cake is the perfect example. It's my twist on a suggestion I found a while back in Mary Engelbreit's "Sweet Treats Dessert Cookbook.''

Before culinary school I used to cheat and buy a ready made Oreo Crust for this cake and it tasted pretty great. This year I thought I had to make my own crust. I separated 20 Oreo cookies and scooped out the cream. Then I crushed the cookies in a food processor, drizzeled 4 tablespoons of melted butter over it, pressed it into a pie plate and froze it for about an hour.  The crust was a little stubborn when I went to cut up the cake. It didn't want to come out of the pie plate, but when I wrestled it out, it did taste wonderful. Maybe next time I'll use less butter or won't press it so tightly together.

The secret to this cake is buying premium quality ice cream. I use 2 pints Haagen-Dazs mint chocolate. I like it because it doesn't have any artificial color to make it green. Then I let the ice cream sit on the counter til it's soft, empty it into a bowl and stir in some green creme de menthe. Next spread the ice cream in the crust and freeze it until it's set. I usually do this over night.

Now comes the fun part: decorating! Place half a pint of heavy cream in a mixer and whipped with a tablespoon of sugar to make a whipped cream that will hold its shape if you want to put it in a piping bag. I also use Andes candies and run a vegetable peeler over a bar of chocolate to get shavings that I scatter on top of the cake.

But you can decorate it anyway you want to make your own perfect summertime treat. Thin Mint girl scout cookies would work really well too if you have any left in the house.

The best part is it takes minimal effort and it will impress the heck out of your friends.

Oh, and did I mention how wonderful and refreshing it taste? Yum!

Tuesday, May 31, 2011

Bread Alone


I can't tell you how happy I am that the height of the anti-carb craze is behind us.

Man (and woman) may not live on bread alone, but life is pretty dreary without it.

There is some inexplicable pleasure in dipping a crusty loaf of Italian bread in a rich tomato sauce I can't even put into words. How can anyone resist spreading a garlicky hummus on pita, or creamy brie on spread on slices of a crunchy crusted bread? Those are moments that just make life better.

We've been eating bread for so long it's mentioned in the bible. If people could make bread all those eons ago without ovens that have a thermostat dial in their homes, than it should be something anyone can do today, right?

Then why don't more people make bread at home?

For some reason yeast is a scary thing for home bakers. I am so glad that culinary school helped me get over this fear. Now all I want to do a day off is make a few loaves of bread I can stick in the freezer and use for the weeks ahead. And the bread I make at home doesn't have high fructose corn syrup or half of the other ingredients that are in the loafs of bread sold on the supermarket shelves.

It helped to learn from one of the best bread makers in the country - Sim Cass, a founding baker at Balthazar- to get over my fear of making bread. I am here to tell you that making bread is one of the easiest things to do and one of the most satisfying. It doesn't require a store bought bread maker. And who wouldn't feel proud after making something of such basic sustenance.

So let me unlock the bread making mystery. It starts with Jeffrey Hamelman's "Bread" book. It has about 80 pages of introduction that explain the bread making process and recipes that are adapted for both the home cook and professional baker.

I haven't ventured past the first chapter yet, breads made with a pre-ferment. That simply means the night before you want to make bread, stir water flour and yeast together in a bowl and cover it with plastic wrap. It might look something like plaster, and creates a stick substances that is pain to clean off your spoon. But over night the magic happens: the yeast starts to do it's work. The next morning the mixture will have doubled in size and be filled with air bubbles - a sign that you have done it right.

Success -a very bubbly pre-ferment!

Here is an easy follow bread recipe that should only take a few hours the next morning and doesn't require much fancy handiwork to shape into loaves. Just remember your pre-ferment needs about 12-16 hours to mature before you start making your dough, so plan accordingly and you won't be trapped in the house all day waiting for it to rise (like I usually am because my preferments are never ready to go before noon).

Oh, wait, let me give you a few other tips first. The secret to bread's crispy crust? Professional ovens have a feature that steam inside the oven to create the crust. Sadly, that is a tough one to replicate, but Chef Sim advised to spray water from a bottle on the outside of the loaf before baking.

Bread is also also baked directly on the floor of the oven, not on racks. In a home oven the best way to replicate this is to place baking sheets in the oven as it preheats and cook the bread directly on the sheets. You can place a little corn meal to stop it from sticking.

Pain Rustique
Adapted from "Bread: A Bakers Book of Techniques and Recipes"
Makes three loaves. Three hours prep time not including the pre-ferment made the night before

The Poolish (or pre-ferment)

1 pound or 3 5/8 cups high gluten bread flour
1 pound or two cups water
1/8 teaspoon instant dry yeast

Pour the water in a bowl, disperse the yeast on top of the water, add the flour and mix until smooth (it will look something like plaster). Cover the bowl with plastic wrap and let stand for 12-16 hours at about 70 degrees.

Get a good nights sleep!

The Dough:

1 pound high gluten bread flour
6.1 oz or 3/4 cup water
all the pre-ferment
.6 oz or 1 tablespoon salt
.17 oz or 1 1/2 tsp instant dry yeast

Add the pre-ferment, flour, and water in a mixing bowl and mix using a bread hook at first speed until it just comes together. Don't add the yeast and salt just yet! Let it rest, covered in plastic for 20-30 minutes. Then sprinkle the salt and yeast on top and mix on second speed for 1 1/2 - 2 minutes.


Bulk Fermentation
This is when you let the dough rest and rise. Let the dough sit in the bowl covered with plastic. Do laundry. Call some friends. Read a book. You have about 70 minutes while the yeast does it's work and you don't have to do very much anything. Just give the dough a few turns once after 25 minutes and again at 50 minutes (turn each side of the dough in toward the middle once, press firmly into the center and then flip over).
 
Dough resting in a lightly oiled bowl on my counter top
 Dividing:

After 70 minutes divide the dough into three one pound two ounces sections (if you don't have a scale divide in three). Don't tear at the dough use a dough knife or regular knife. Place the pieces on a floured linen on a baking sheet, cover with plastic and let rest for another 20-25 minutes at 76 degrees. This is the final fermentation stage. A little humidity doesn't hurt at this point. In the winter I've turned on my shower (our bathroom is off of the kitchen) and let the kitchen get a little steamy.

At this point pre-heat the oven to 460 degrees with the baking sheets inside. When the dough is ready slash it with a razor across the center, spray with water, place on the baking sheets in the oven and bake for about 35 minutes, until it's nice and dark.

My bread right out of the oven - I am so proud!

Tuesday, May 10, 2011

A Volunteer at the James Beard Awards

I wonder if film students in L.A. get to volunteer at the Oscars?

Because that is what it felt like for me volunteering last night at the 2011 James Beard Awards Gala.

I was so lucky to be teamed up with the chefs from Clio Restaurant in Boston. They were a bunch of very laid back tattooed all over kind of guys. But best of all, they had done all their food prep in Boston and brought their amazing white curry trip dish ready for service. So I had hours and hours to wander around before they needed help plating to serve the 1,800 guests.

Preparations for the James Beard Awards Gala at Avery Fisher Hall 

I saw Food Network star Anne Burrell talking on her cell phone on the Red Carpet waiting to get into the event. Bobby Flay signed my program after I babbled something about loving Throwdown and eating at Mesa Grill for my birthday. I had a Jersey Pride moment when Chef Vola's in Atlantic City was recognized as an American Classic.


Anne Burrell outside Lincoln Center

One of my favorite moments was Gabrielle Hamilton's acceptance speech for Best Chef in New York City. In talking about how much she loved her profession, she exclaimed: "We don't spill oil on the shore line. We don't rob people of their money. It's pretty honest work.''

That kinda summed up why I enrolled in Culinary School after working for 14 years as a reporter. Chefs make people happy. They expose us to new cultures and new ideas. They feed the hungry and the sick. Sometimes I feel like studying baking and pastry is a totally self indulgent and I worry that my life won't be any different when I am done. But I believe people who cook for a living do important things, shape our relationships with food, and are part of an amazing tradition that goes back to ancient times. And hopefully I will have a shot at doing something memorable like starting the next great dessert trend.

In case you haven't realized it, I am totally star struck. Last night I got to be part of the biggest event of the year in the food world. I got to sample creations from some of the best chef's in the country. But now it's time for this aspiring pastry chef to come down from cloud nine and head back to my paying job.

If I am lucky tonight I will have time to grab a slice of pizza from a restaurant in a Jersey strip mall before heading to cover a school board meeting. But I will probably still have a big smile on my face remembering all the fun I had last night.

Complete list of James Beard 2011 Award winners: 

Best New Restaurant
ABC Kitchen, New York City; Chef/Owner: Jean-Georges Vongerichten; Owner: Phil Suarez

Outstanding Chef Award
José Andrés, minibar, Washington, D.C.

Outstanding Pastry Chef Award
Angela Pinkerton, Eleven Madison Park, New York City

Outstanding Restaurant Award
Eleven Madison Park, New York City; Owner: Danny Meyer

Outstanding Restaurateur Award
Richard Melman, Lettuce Entertain You Enterprises, Chicago

Outstanding Service Award
Per Se, New York City, Chef/Owner: Thomas Keller

Outstanding Wine and Spirits Professional Award
Julian P. Van Winkle, III; Old Rip Van Winkle Distillery, Louisville

Outstanding Wine Service Award
The Modern, New York City; Wine Director: Belinda Chang

Rising Star Chef of the Year Award
Gabriel Rucker, Le Pigeon, Portland, Ore.

Best Chef: Great Lakes (Illinois, Indiana, Michigan, Ohio)
Alex Young, Zingerman’s Roadhouse, Ann Arbor, Mich.

Best Chef: Mid-Atlantic (Washington, D.C., Delaware, Maryland, New Jersey, Pennsylvania, Virginia)
Michael Solomonov, Zahav, Philadelphia

Best Chef: Midwest (Iowa, Kansas, Minnesota, Missouri, Nebraska, North Dakota, South Dakota, Wisconsin)
Isaac Becker, 112 Eatery, Minneapolis

Best Chef: New York City
Gabrielle Hamilton, Prune, New York City

Best Chef: Northeast (Connecticut, Massachusetts, Maine, New Hampshire, New York excluding the five boroughs of New York City, Rhode Island, Vermont)
Tony Maws, Craigie On Main, Cambridge, Mass.

Best Chef: Northwest (Alaska, Idaho, Montana, Oregon, Washington, Wyoming)
Andy Ricker, Pok Pok, Portland, Ore.

Best Chef: Pacific (California, Hawaii)
Michael Tusk, Quince, San Francisco

Best Chef: South (Alabama, Arkansas, Florida, Louisiana, Mississippi)
Stephen Stryjewski, Cochon, New Orleans

Best Chef: Southeast (Georgia, Kentucky, North Carolina, South Carolina, Tennessee, West Virginia)
Andrea Reusing, Lantern, Chapel Hill, N.C.

Best Chef: Southwest (Arizona, Colorado, New Mexico, Nevada, Oklahoma, Texas, Utah)
Saipin Chutima, Lotus of Siam, Las Vegas, and Tyson Cole, Uchi, Austin, Tex. (tie)

Who’s Who of Food & Beverage in America Inductees
Jonathan Gold, Writer, LA Weekly, Los Angeles
Lee Jones, Farmer/ Owner, Chef’s Garden, Huron, Ohio
Charles Phan, Chef/Owner, The Slanted Door, San Francisco
Frank Stitt, Chef/Owner, Highlands Bar and Grill, Birmingham, Ala.
Nick Valenti, CEO, Patina Restaurant Group, New York City

America’s Classics Awards
Chef Vola’s, Atlantic City, N.J.; Owners: Louise Esposito, Michael Esposito, Michael Esposito Jr., Louis Esposito
Crook’s Corner, Chapel Hill, NC; Owner: Gene Hamer
Noriega Restaurant and Hotel, Bakersfield, Calif., Owners: Linda Elizalde McCoy and Rochelle Ladd
Le Veau d’Or, New York City; Owner: Robert Tréboux
Watts Tea Shop, Milwaukee; President and CEO: Sam Watts

Lifetime Achievement Award
Kevin Zraly

Humanitarian of the Year
FareStart

Friday, April 29, 2011

The Search for the Best Brownie Recipe


I never thought I would come across a recipe that could match Nick Maglieri's Supernatural Brownies. They are deep, rich, moist, and simple to make. All the characteristics of the best brownies recipe in my book.

But that was before I discovered Baked in Red Hook, Brooklyn.  I love everything about the place from the incredible frosting on the cup cakes to the owner's story. Baked was founded by Matt Lewis and Renato Poliafito. They met while working at an advertising agency, but their first love was dessert. All the stories I came across about the pair said they were tired of the cupcake craze and cakes that were shaped like purses, but tasted like cardboard. Matt Lewis went to ICE (back when it was still the Peter Kump School) at night and the two ended up opening a wonderful bakery with a focus on classic American desserts, made even better.

So back to the brownies.

While I was doing research on Baked and toying with the idea of interning their for class (why 'o why is there no subway that goes to Red Hook) I came across my new favorite recipe: Matt and Renato's Baked Spicy Brownie. It has so much flavor it left me speechless. After my first bite I had a look on my face that made my husband jealous. They are that good. These brownies earn my high praise because they have a little kick to them with some ancho chilli powder, fresh ground ginger (I used grated fresh ginger root - amazing) and cinnamon. I gave some to friend of mine and she told me they were too good to share with her husband. I take that as the highest compliment.

My deepest thanks to Matt and Renato for coming up with the best brownies recipe imaginable!

The Baked Spicy Brownie

Ingredients
  • 3/4 cup all-purpose flour
  • 1/4 tsp. salt
  • 1 Tbsp. plus 1 tsp. Dutch cocoa powder
  • 1 Tbsp. ancho chili powder
  • 1/2 tsp. cinnamon
  • 5 ounces coarsely chopped dark (60 percent) chocolate
  • 1 stick unsalted butter , plus more for pan
  • 3/4 cup granulated sugar
  • 1/4 cup packed light brown sugar
  • 3 large eggs
  • 1 tsp. pure vanilla extract
  • 1/4 tsp. freshly grated ginger
Directions
Preheat oven to 350°. Butter sides and bottom of a glass or light-colored metal 8" x 8" pan.

In a medium bowl, whisk together flour, salt, cocoa powder, chili powder, and cinnamon.

Configure a double boiler (fill a medium saucepan with 2 inches of water and fit a metal bowl on top without letting it touch water; bring water to a boil). Place chocolate and butter in bowl and stir occasionally until both are completely melted and combined, about 6 minutes. Turn off heat, but keep bowl over water and add both sugars. Whisk until completely combined and remove bowl from pan. Let stand until room temperature, about 20 minutes.

Add eggs to chocolate-butter mixture and whisk until just combined. Add vanilla and ginger; whisk to combine. Do not overbeat the batter at this stage or the brownies will be cakey.

Sprinkle flour-cocoa mixture over chocolate mixture. Using a spatula (do not use a whisk!), fold the dry ingredients into the wet until there is just a trace amount of the flour-cocoa mix visible.

Pour batter into the greased pan and smooth the top with the spatula. Bake brownies for 27 to 30 minutes; brownies are done when a toothpick inserted in the center comes out with a few moist crumbs. Cool brownies completely before cutting and serving.

Tuesday, April 19, 2011

Happy Passover - Now Please Pass the Dessert


I am hear to debunk the myth that it is impossible to make a Passover cake that tastes good.

I remember a few years ago, before I had a reputation as a good cook, I offered to bring dessert to a Passover sedar at an ex-boyfriend's house. His mother made a face and told me all Passover over desserts taste like cardboard.

Proving her wrong made me very happy. That is probably one of the reasons that relationship didn't work.

But I digress. Here is an easy Passover dessert recipe that can be served with meat or dairy - it was a big hit at our sedar last night and I had to fight to get a slice for myself!

Apple Nut Cake
Adapted from The New Jewish Holiday Cookbook by Gloria Kaufer Green

For the filling:
1/2 cup finely chopped walnuts
1/4 cup sugar
1 generous teaspoon cinnamon
1 large golden delicious apple or other baking apple

Batter:

2 large eggs, one separated
1 cup sugar divided
1/3 cup canola oil
1/4 cup orange juice
3/4 cup matzah cake meal
2 large egg whites

Grease an 8'' square baking pan and set aside. Preheat oven to 350 degrees.

For the filling combine walnuts, sugar, and cinnamon, set aside.

Peel the apple if desired (it's not necessary and I don't usually do it). Core and thinly slice it.

For the batter combine 1 whole egg and one yolk (reserve the white) in a medium mixing bowl and beat with an electric mixer until thick. Gradually add 3/4 cup of the sugar and beat until light. Beat in the oil and orange juice until well combined. Then at slowest speed mix in matzah cake meal.

Put the remaining three eggs into a mixing bowl and use clean beaters to beat til frothy. Gradually add last 1/4 cup sugar and beat until forms stiff peaks. Fold whites into the matzah cake meal mixture mixing completely.

Pour half of the batter into the bottom of the prepared pan and use a spatula to spread it evenly. Sprinkle with 2/3 of the nut mixture . Arrange apple slices in one layer on top of the nuts. Cover with the remaining batter and then sprinkle the remaining nut mixture on top. Bake in the oven at 350 degrees for 40-45 minutes or until a wooden toothpick comes out clean. Cool completely on wire wrack. Cut into squares or rectangles to serve.

Thursday, April 14, 2011

It's not all easy but worth it


I realize my perception of easy has changed dramatically since I started culinary school.

I recently brought a fruit tart to work that I made over the weekend in class. My co-workers thought it looked impressive. All I saw was it's flaws...the crust was slightly uneven, the kiwi not perfectly cut. But I was still proud of it considering how neverous I was about the assignment: design a beautiful cake that could sell for $35 in a bakeshop.

The next day when I brought the cake to work, and people asked me how I did it, I told them it was easy. My stress and nervousness of the day before disappeared when I saw what I accomplished. The steps of making the crust, filling it with rasberry flavored pastry cream, cutting up fruit and the struggle to artfully arrange rasberries, kiwi, strawberries and blueberries on the tart didn't seem so difficult the morning after.

But the truth is when I am in class the work seem more than a little intimidating. There are plenty of frustrating moments when I worry that I can't do something, or I feel like I am back in the third grade being criticized by the teacher for having bad handwriting that she hinted would doom my entire future.

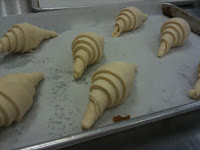
But the assignments I've worried about the most -like being able to roll  out croissant dough and shape it perfectly, turned out pretty good. When I start to get too frustrated, I remind myself that our instructor has been doing this for nearly 40 years. I tell myself not get discouraged that I can't get something perfect the first time, or that it is a lot harder than he makes it look.

Success rolling croissants before they want in the oven

During the week in between I mull over my successes and failures in class. After a few days pass, my confidence increases. I realize I am learning a lot and if I keep I'll be able to make it seem as easy as the chef one day. For now my creations might not make the cut at Bouchon Bakery or Balthazar, but they impress my friends and co-workers and taste pretty good. While I have a learning curve ahead of me, for now I'll take that as my little victory to celebrate.

Success! My instructor called this mini tart beautiful!

 And at leat my most important critic approves.

Jeff enjoying a chocolate croissant I made in
 class


Tuesday, April 5, 2011

My New Favorite Treat


All these years that I've been spreading cream cheese on bland matzo, I've been missing out on a much more tasty treat: Hot Cross Buns.

Guess I shouldn't be surprised since these fragrant buns crop up in bakery windows in time for Easter - hence the cross.

But they are so tasty with freshly grated nutmeg, allspice and cinnamon, candied orange peel and currants mixed in the dough that I think I'll ignore their association with the holiday (like I do with cadbury eggs and chocolate bunnies) and grab some they next time I spot them in a store.

My obsession started when we made Hot Cross Buns in Chef Sim Cass's class at the Institute of Culinary Education. Cass was a founding baker at Balthazar, and I've heard him called one of the best bread makers in the country. So I feel really lucky to be in his class, no matter how rigorous it is or how beat I am when I get home.

I'll share the recipe we used in class, although it might be a little labor intensive for a home baker. But unlike some of the breads we made with Cass, these buns can be cooked in an ordinary oven so it is not impossible to make it on your own.

But if you see them in a bakery window take the easy way out pick up about half a dozen - they are so worth it!

Thursday, March 17, 2011

Celebrating Our Jewish Grandmothers


Faye Horowitz
My grandmother would have turned 100 years old this year.
I used to joke that she was some kind of spy. But the truth is I wish I knew more about her.

A few years ago my cousin dug out papers from when my grandmother came to the United States on a ship from London. She was 10 months old. The spy theory grew because her name was spelled different ways on all of her papers. She was Frannie, Fagle  and Faye, the name I knew her buy growing up. Her maiden name was spelled differently too – Kittay and Kittaje.

Like many grandmothers, she was my earliest cooking influence. She was strictly kosher. She brought her own food when she came to visit our house. I remember that she threw out a dish once when my father washed it for her with non kosher soap. She said it was Traf – no longer kosher.

Her recipes are all lost. My mother doesn't think she had ever written any of them down. The one dish I remember my grandmother would bring to our house was her meatballs. I would nibble at them, which was pretty impressive for a little kid who was an incredibly picky eater.

My grandmother is the reason why my mother doesn't cook. She was a slave to the kitchen. My mother told me once she didn’t want to be like that. And she never was.

I’m certain my grandmother is responsible for my obsession with chocolate. She always had a Hershey Bar in her purse. She would break off pieces and snack on it through out the day. When she came to visit she would bring heavy, dense frosted brownies that I think couldn’t come from anywhere else than the kosher bakeries in her Bronx neighborhood. She would bring me Hershey Kisses too. Those were my favorite. I’ll even admit that HersheyKiss was my profile name when I met my husband on Jdate.

My grandmother died when I was in college. She had been sick for years and didn’t remember much at the end. She thought her husband was still alive and was angry that he never came to visit. Watching her made me never want to grow old.

In honor of my grandmother's 100th birthday, I'm posting my favorite brownie recipe. I have yet to come across a recipe for the dense frosted brownies my grandmother used to bring to our house. But these brownies are really rich, easy to make, and always impress a crowd. The trick is letting them cool and set over night before serving.


courtesy of Saveur.com

 
Supernatural Brownies
another recipe by Nick Malgieri,
Director of the baking program at the Institute of Culinary Education

Ingredients:

2 sticks (16 tablespoons) butter, more for pan and parchment paper
8 ounces bittersweet chocolate
4 eggs
1/2 teaspoon salt
1 cup dark brown sugar
1 cup granulated sugar
2 teaspoons vanilla extract
1 cup flour
1/2 cup chopped walnuts or 3/4 cup whole walnuts, optional.

Butter a 13-by-9-inch baking pan and line with buttered parchment paper.

Preheat oven to 350 degrees.

In top of a double boiler set over barely simmering water, or on low power in a microwave, melt butter and chocolate together. Cool slightly.

Whisk eggs in a large bowl. Whisk in salt, sugars and vanilla.

Whisk in chocolate mixture. Fold in flour just until combined. If using chopped walnuts, stir them in. Pour batter into prepared pan. If using whole walnuts, arrange on top of batter. Bake for 35 to 40 minutes or until shiny and beginning to crack on top. Cool in pan on rack.

Yield: 15 large or 24 small brownies.

Note: For best flavor, bake 1 day before serving, let cool and store, tightly wrapped.


Wednesday, February 16, 2011

When Life Gives you Lemons and Simple Syrup


I know it's a little early to be talking about lemonade.

But we were learning about cooking with sugar in class this weekend and it was on the lesson plan.

And the batch of lemonade came out with the perfect balance of tartness and sweetness that I had to share. It reminded me of the lemonade at my favorite stand on the Asbury Park boardwalk.

I'm going to be saving this recipe for the first heat wave of the season, which can't come soon enough.

The simple syrup can also be used in iced coffee so I will definitely be keeping a batch of it on hand this summer. Our instructor said it can be stored in the fridge for a while, but knowing how sweet I like my coffee, I doubt it will last very long.

Here is the recipe. You'll need a candy thermometer, but otherwise it's something easy that can be done at home.

SUGAR SYRUP

6 fluid ounces water
1 pound of sugar
1/2 teaspoon cream of tartar dissolved in 1/2 teaspoon water or 1 tablespoon light corn syrup

-Place water in saucepan over low heat
-Sprinkle sugar on top of the water
-Shake the pan on the stove - do not stir (a trick the instructor taught us for working with sugar)
if sugar has turned color because of impurities skim off discolored foam and cover for 2 minutes while boiling, if there are no impurities leave uncovered
-At the boiling point add cream of tartar or corn syrup
- Boil until candy thermometer reaches 230 degrees

Lemonade

8 oz sugar syrup
1 cups cold water
10 ounces lemon juice (squeeze lemons into a measuring cup until it reaches 10 oz)

Add cold water and lemon juice to the simple syrup. Stir. Pour over ice and serve!


You can adjust the lemon juice or syrup if its too sweet or tart. I liked the balance of our recipe and it got Jeff's approval, too!

Wednesday, February 9, 2011

Research: Bubby's Mile High Apple Pie


Part of my "studies" for Culinary School requires checking out some of New York City's best restaurants and bakeries to learn all the characteristics of what makes a good dessert.

Sounds too good to be true, right? But it was some of the first advice we were given in class: go visit some wonderful bakeries, bread shops and markets, talk to the owners, ask to see the kitchen and even ask if you can work there for a day to get experience.

It sounds like heaven to me!

So one of the first places I checked out was Bubby's Pie company in Tribecca. I had stumbled across "Bubby's Brunch Cookbook" by restaurant owner Ron Silver in a gift shop a few weeks before and couldn't wait to see the place.

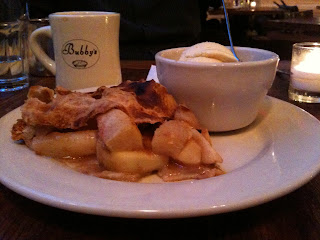
We ended up there late in the afternoon - way past the brunch hour. So instead of trying Bubby's legendary sour cream pancakes we opted for the Mile High Apple Pie at the recommendation of our waitress. The balance of cinnamon, nutmeg and cloves and made it the best apple pie I've ever had. And the light flaky crust has the perfect degree of crispness. I was so impressed I bought another cookbook at the restaurant by the owner, "Bubby's Homemade Pies," and had it autographed by Silver.


BUBBY'S MILE HIGH APPLE PIE
From "Bubby's Homemade Pie's" by Ron Silver and Jen Bervin

The secret to make Bubby's pie “mile high” is to pile the apples higher than the tin. The apple's will cook down while baking but the crust remains sculptural, curvaceous, and high. Bubby's uses local Macouns apples from the farmer's market if available. The recipe suggests sautéing the apples in butter first. 

Pastry for a 9-inch double-crust pie, chilled
3½ pounds apples
4 tablespoons (½ stick) unsalted butter
¾ cup sugar, plus extra for sprinkling on the top crust
3 tablespoons all-purpose flour
1 tablespoon fresh-squeezed lemon juice
1 teaspoon salt
1 teaspoon ground cinnamon
¼ teaspoon ground nutmeg
Pinch ground cloves

 DIRECTIONS

Roll out the smaller batch of pastry and line a 9-inch pie tin with the bottom crust. Roll out the remaining large ball of dough for the top crust. Rechill the pastry if necessary.


Peel, core, and slice the apples ¼ to ½ inch thick (to get about 7 cups). In a large sauté pan, melt the butter and sauté the apples for 2 to 3 minutes, until the outer edges get slightly soft. Remove from heat. In the pan, measure the sugar, flour, butter, lemon juice, salt, cinnamon, nutmeg, and cloves on top of the apples, but do not stir until they are ready to go into the pie or they will get too soupy.

Preheat the oven to 450°F.

When you are ready to proceed, toss the apples with the other filling ingredients. Because this pie is so tall, mounding up the apples takes a little finesse. Scrape the apple filling into the bottom crust until the pie reaches average height, then add the remaining apples by the handful, using your free hand to steady the mound.

Cover it with the second crust. Trim and crimp the crust; chill the pie for 10 minutes in the freezer. Cut vent slits in the top crust and sprinkle it very lightly with water and then sugar. Because the top crust slope is so steep, you need to flick a little water at it to keep the sugar from rolling off and caking at the crust edge when you sprinkle it on.

Bake the pie on a lipped baking sheet for 10 minutes, or until the crust looks dry, blistered, and blonde. Turn the oven down to 375°F, and bake for at least 30 minutes more, or until the crust is golden brown and visible juices are thickened and bubble slowly through slits in the top crust. With a pie this high, you can expect some runoff on the tray. Test apples for doneness by poking a wooden skewer down through the open vent slits of the top crust. Apples inside should yield to the skewer with slight resistance—cooked through but not mushy. Look for thick slow bubbles where the juices pool near the edge of the crust.

Cool the pie completely before cutting, at least a few hours. Serve it at room temperature. Store the pie uncovered at room temperature, up to 3 days.

Bubby's All Butter Pastry Dough
From "Bubby's Homemade Pies"

An all-butter crust takes finesse to mix and handle because butter gets soft quickly at room temperature. Keeping a butter crust cold takes more attention, but pays off in flavor and flakiness. Its versatile flavor complements and accentuates other flavors in much the same way that a pat of butter and a pinch of salt do in the filling.

For 8- to 10-inch double crust
or 12-inch single crust:

5 to 6 tablespoons ice cold water
2 cups all-purpose flour
1/2 teaspoon salt
11-1/2 tablespoons cold unsalted butter

Measure out the water for the crust (with a bit of extra water in the measure in case you need a touch more) and then add ice cubes. Chill it in the freezer.

Measure out the flour (unsifted) by leveling off dry measuring cups, and add the flour to large bowl. Add the salt to the flour and give it a quick stir to combine evenly.

Use cold butter, measure out the amount you need, and then coat the cold, solid stick with the flour in the bowl. Using a dough scraper or a long butcher knife, cut the butter lengthwise in half, and then lengthwise in quarters, coating each newly cut side with flour as you go. Dice the butter into 1/4 inch cubes (or 1-inch sticks if using a food processor). Break up any pieces that stick together and toss them all to coat them with flour. (If it is a warm day, chill this mixture briefly in the freezer before continuing.)

Hand Method: Using a pastry cutter, press the blades through the mixture, bearing down repeatedly like you would to mash potatoes. Repeat this gesture until the largest pieces of fat are the size of shelling peas and the smallest are the size of lentils (none smaller). Do not get over-enthusiastic here: this size range makes for excellent flakiness. Rechill if necessary.

Food Processor Method: Add the flour, salt, and butter mixture to the food processor and pulse it a few times. Do not use the continuous ON setting for pastry. To get the fat to cut in evenly you must stop and angle the entire food processor to give its contents a jostle by shaking and tilting it every couple of pulses. Pulse the mixture until the larger fat pieces are the size of shelling peas and the smallest fat pieces are the size of lentils. Do not overmix. Watch closely—it typically takes less than 10 quick pulses to get there. If you have a few bigger chunks of butter in a mixture that is otherwise perfect, dump the mixture into a large bowl and cut the bigger chunks down to size by hand with a pastry cutter so that the whole mixture remains consistent for flakiness.Transfer the fat and flour mixture to a bowl and chill it. Do not use the food processor to add the water to a pastry crust. Always mix in the water by hand.

When adding the water, begin with a fully chilled flour and fat mixture and ice cold water. Be judicious, even stingy, with the water. Do not add all the water at once; it must be dispersed into the mixture incrementally. Add water two or three tablespoons at first, quickly tossing the mixture with your hands after each addition with light upward motion to distribute the water evenly throughout it. Work the dough as little as possible.
Continue adding little bits of water at a time. When there are no floury bits anymore—just little comet-like cobbles that don't quite cohere—slow down and sprinkle or flick water in at this point. One drop can make the difference and bring it all together. The balance can shift quickly from crumbly to wet. You might need a touch more water. The pastry should be just a little bit tacky when you touch it.

To test the dough for consistency, lightly pat together some dough the size of a tennis ball. If the ball crumbles apart or has lots of dry-looking cracks in it, the dough is still too dry; let it break apart. Add a drop or two of water to the outside of the ball and work it just a little. If it holds and feels firm and supple, mop up any remaining crumbs with the ball—if they pick up easily, the dough is probably wet enough. If they fall back into the bowl, you might need a touch more water to pull the dough together. The pastry should be just a little bit tacky when you touch it.

Wet dough may seem easier to work, but because the extra water overdevelops the gluten it makes a really tough crust. If your pie dough is stretchy (glutinous) and quickly retracts when you roll it out, chances are you have added more water than you need and your pastry is overworked. If your dough is quite sticky, soft, and wet, it is better to pitch it and start over.

Dough can feel like it's holding together because the butter is melting. If at any point the dough ceases to feel cool to the touch or the butter pieces feel melty, soft, and warm, put the whole mixture in the freezer until it's cooled down again—about 10 minutes. It's impossible to gauge the water ratio accurately if the fat is melting into the flour.

For double crust, divide the dough into slightly uneven halves and shape each half into a ball—the larger of which will be for the bottom crust, the smaller ball for the top. Cover each ball tightly with plastic wrap and refrigerate it for at least half an hour to relax and slow the gluten development and rechill the fat. In practical terms, this cold rest makes the dough easier to roll out.  

Monday, January 31, 2011

My Big Announcement


After agonizing for years, I made my final decision so quickly that I realized I haven't told many people yet:

I've enrolled in culinary school.

It was something I've wanted to do for awhile,  but was always afraid I didn't have the money or the time. Neither of those circumstances have changed, but I decided if I was ever going to do it, I should jump in before we have a family and life gets even more complicated. So I took out student loans (I'm not going to say how much because it still freaks me out) and signed up for classes 9-5 on Saturdays and Sundays at the Institute of Culinary Education in New York City, while holding onto my full-time job. 

I'm studying to get a diploma in baking and pastry. Maybe I can use it to open my dream cookie shop one day. Or it can help with my husband's idea of opening a Bed and Breakfast in Asbury Park. No matter what I end up doing with it, at least I won't have to wonder anymore if it's something that I should have done.

I just finished my second week of classes. We've done some simple things like make caramel, which just involved heating half a pound of sugar and 1/2 teaspoon lemon juice. Before it hardened we drizzled the hot liquid off the tip of a spoon to make designs like this caramel Saturn:


The second week our work got a little more complicated. We made apricot pectin candies called pate de fruits which I heard one of my classmates describe as a flavor explosion. Very accurate.


We also learned how to cut up, poach, dry, candy and macerate fruit (soaking in sugar to draw out some of the liquid which enhances flavor). Buried under all that wonderful Zabaglione cream are strawberries and basil that soaked in sugar with a 1/2 teaspoon of balsamic vinegar for about an hour.


I'm not sure how I went from growing up to in a house where cakes came from mixes or the supermarket bakery to candying grapefruit rinds in class and making my own mayonnaise. I've always wondered if my parents had enjoyed food more, would I have known how much I love it from an early age and taken a different career path? I had no idea how wonderful food could taste - or there was more to eating out than Chinese restaurants - until I became an adult. But I've learned there is something magical about food that makes people happy and I am hoping to learn to tap into that magic.

And yes, I do get to bring home what I make in class and will share with everyone!