Wednesday, February 16, 2011
When Life Gives you Lemons and Simple Syrup
I know it's a little early to be talking about lemonade.
But we were learning about cooking with sugar in class this weekend and it was on the lesson plan.
And the batch of lemonade came out with the perfect balance of tartness and sweetness that I had to share. It reminded me of the lemonade at my favorite stand on the Asbury Park boardwalk.
I'm going to be saving this recipe for the first heat wave of the season, which can't come soon enough.
The simple syrup can also be used in iced coffee so I will definitely be keeping a batch of it on hand this summer. Our instructor said it can be stored in the fridge for a while, but knowing how sweet I like my coffee, I doubt it will last very long.
Here is the recipe. You'll need a candy thermometer, but otherwise it's something easy that can be done at home.
SUGAR SYRUP
6 fluid ounces water
1 pound of sugar
1/2 teaspoon cream of tartar dissolved in 1/2 teaspoon water or 1 tablespoon light corn syrup
-Place water in saucepan over low heat
-Sprinkle sugar on top of the water
-Shake the pan on the stove - do not stir (a trick the instructor taught us for working with sugar)
if sugar has turned color because of impurities skim off discolored foam and cover for 2 minutes while boiling, if there are no impurities leave uncovered
-At the boiling point add cream of tartar or corn syrup
- Boil until candy thermometer reaches 230 degrees
Lemonade
8 oz sugar syrup
1 cups cold water
10 ounces lemon juice (squeeze lemons into a measuring cup until it reaches 10 oz)
Add cold water and lemon juice to the simple syrup. Stir. Pour over ice and serve!
You can adjust the lemon juice or syrup if its too sweet or tart. I liked the balance of our recipe and it got Jeff's approval, too!
Wednesday, February 9, 2011
Research: Bubby's Mile High Apple Pie
Part of my "studies" for Culinary School requires checking out some of New York City's best restaurants and bakeries to learn all the characteristics of what makes a good dessert.
Sounds too good to be true, right? But it was some of the first advice we were given in class: go visit some wonderful bakeries, bread shops and markets, talk to the owners, ask to see the kitchen and even ask if you can work there for a day to get experience.
It sounds like heaven to me!
So one of the first places I checked out was Bubby's Pie company in Tribecca. I had stumbled across "Bubby's Brunch Cookbook" by restaurant owner Ron Silver in a gift shop a few weeks before and couldn't wait to see the place.
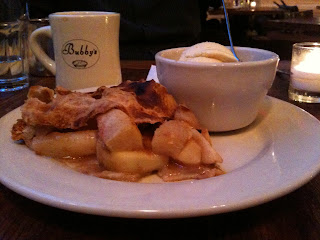
We ended up there late in the afternoon - way past the brunch hour. So instead of trying Bubby's legendary sour cream pancakes we opted for the Mile High Apple Pie at the recommendation of our waitress. The balance of cinnamon, nutmeg and cloves and made it the best apple pie I've ever had. And the light flaky crust has the perfect degree of crispness. I was so impressed I bought another cookbook at the restaurant by the owner, "Bubby's Homemade Pies," and had it autographed by Silver.
Sounds too good to be true, right? But it was some of the first advice we were given in class: go visit some wonderful bakeries, bread shops and markets, talk to the owners, ask to see the kitchen and even ask if you can work there for a day to get experience.
It sounds like heaven to me!
So one of the first places I checked out was Bubby's Pie company in Tribecca. I had stumbled across "Bubby's Brunch Cookbook" by restaurant owner Ron Silver in a gift shop a few weeks before and couldn't wait to see the place.
We ended up there late in the afternoon - way past the brunch hour. So instead of trying Bubby's legendary sour cream pancakes we opted for the Mile High Apple Pie at the recommendation of our waitress. The balance of cinnamon, nutmeg and cloves and made it the best apple pie I've ever had. And the light flaky crust has the perfect degree of crispness. I was so impressed I bought another cookbook at the restaurant by the owner, "Bubby's Homemade Pies," and had it autographed by Silver.
BUBBY'S MILE HIGH APPLE PIE
From "Bubby's Homemade Pie's" by Ron Silver and Jen Bervin
The secret to make Bubby's pie “mile high” is to pile the apples higher than the tin. The apple's will cook down while baking but the crust remains sculptural, curvaceous, and high. Bubby's uses local Macouns apples from the farmer's market if available. The recipe suggests sautéing the apples in butter first.
Pastry for a 9-inch double-crust pie, chilled
3½ pounds apples
4 tablespoons (½ stick) unsalted butter
¾ cup sugar, plus extra for sprinkling on the top crust
3 tablespoons all-purpose flour
1 tablespoon fresh-squeezed lemon juice
1 teaspoon salt
1 teaspoon ground cinnamon
¼ teaspoon ground nutmeg
Pinch ground cloves
DIRECTIONS
Roll out the smaller batch of pastry and line a 9-inch pie tin with the bottom crust. Roll out the remaining large ball of dough for the top crust. Rechill the pastry if necessary.
Peel, core, and slice the apples ¼ to ½ inch thick (to get about 7 cups). In a large sauté pan, melt the butter and sauté the apples for 2 to 3 minutes, until the outer edges get slightly soft. Remove from heat. In the pan, measure the sugar, flour, butter, lemon juice, salt, cinnamon, nutmeg, and cloves on top of the apples, but do not stir until they are ready to go into the pie or they will get too soupy.
Preheat the oven to 450°F.
When you are ready to proceed, toss the apples with the other filling ingredients. Because this pie is so tall, mounding up the apples takes a little finesse. Scrape the apple filling into the bottom crust until the pie reaches average height, then add the remaining apples by the handful, using your free hand to steady the mound.
Cover it with the second crust. Trim and crimp the crust; chill the pie for 10 minutes in the freezer. Cut vent slits in the top crust and sprinkle it very lightly with water and then sugar. Because the top crust slope is so steep, you need to flick a little water at it to keep the sugar from rolling off and caking at the crust edge when you sprinkle it on.
Bake the pie on a lipped baking sheet for 10 minutes, or until the crust looks dry, blistered, and blonde. Turn the oven down to 375°F, and bake for at least 30 minutes more, or until the crust is golden brown and visible juices are thickened and bubble slowly through slits in the top crust. With a pie this high, you can expect some runoff on the tray. Test apples for doneness by poking a wooden skewer down through the open vent slits of the top crust. Apples inside should yield to the skewer with slight resistance—cooked through but not mushy. Look for thick slow bubbles where the juices pool near the edge of the crust.
Cool the pie completely before cutting, at least a few hours. Serve it at room temperature. Store the pie uncovered at room temperature, up to 3 days.
Bubby's All Butter Pastry Dough
From "Bubby's Homemade Pies"
Wet dough may seem easier to work, but because the extra water overdevelops the gluten it makes a really tough crust. If your pie dough is stretchy (glutinous) and quickly retracts when you roll it out, chances are you have added more water than you need and your pastry is overworked. If your dough is quite sticky, soft, and wet, it is better to pitch it and start over.
Bubby's All Butter Pastry Dough
From "Bubby's Homemade Pies"
An all-butter crust takes finesse to mix and handle because butter gets soft quickly at room temperature. Keeping a butter crust cold takes more attention, but pays off in flavor and flakiness. Its versatile flavor complements and accentuates other flavors in much the same way that a pat of butter and a pinch of salt do in the filling.
For 8- to 10-inch double crust
or 12-inch single crust:
5 to 6 tablespoons ice cold water
2 cups all-purpose flour
1/2 teaspoon salt
11-1/2 tablespoons cold unsalted butter
Measure out the water for the crust (with a bit of extra water in the measure in case you need a touch more) and then add ice cubes. Chill it in the freezer.
Measure out the flour (unsifted) by leveling off dry measuring cups, and add the flour to large bowl. Add the salt to the flour and give it a quick stir to combine evenly.
Use cold butter, measure out the amount you need, and then coat the cold, solid stick with the flour in the bowl. Using a dough scraper or a long butcher knife, cut the butter lengthwise in half, and then lengthwise in quarters, coating each newly cut side with flour as you go. Dice the butter into 1/4 inch cubes (or 1-inch sticks if using a food processor). Break up any pieces that stick together and toss them all to coat them with flour. (If it is a warm day, chill this mixture briefly in the freezer before continuing.)
Hand Method: Using a pastry cutter, press the blades through the mixture, bearing down repeatedly like you would to mash potatoes. Repeat this gesture until the largest pieces of fat are the size of shelling peas and the smallest are the size of lentils (none smaller). Do not get over-enthusiastic here: this size range makes for excellent flakiness. Rechill if necessary.
Food Processor Method: Add the flour, salt, and butter mixture to the food processor and pulse it a few times. Do not use the continuous ON setting for pastry. To get the fat to cut in evenly you must stop and angle the entire food processor to give its contents a jostle by shaking and tilting it every couple of pulses. Pulse the mixture until the larger fat pieces are the size of shelling peas and the smallest fat pieces are the size of lentils. Do not overmix. Watch closely—it typically takes less than 10 quick pulses to get there. If you have a few bigger chunks of butter in a mixture that is otherwise perfect, dump the mixture into a large bowl and cut the bigger chunks down to size by hand with a pastry cutter so that the whole mixture remains consistent for flakiness.Transfer the fat and flour mixture to a bowl and chill it. Do not use the food processor to add the water to a pastry crust. Always mix in the water by hand.
When adding the water, begin with a fully chilled flour and fat mixture and ice cold water. Be judicious, even stingy, with the water. Do not add all the water at once; it must be dispersed into the mixture incrementally. Add water two or three tablespoons at first, quickly tossing the mixture with your hands after each addition with light upward motion to distribute the water evenly throughout it. Work the dough as little as possible.
Continue adding little bits of water at a time. When there are no floury bits anymore—just little comet-like cobbles that don't quite cohere—slow down and sprinkle or flick water in at this point. One drop can make the difference and bring it all together. The balance can shift quickly from crumbly to wet. You might need a touch more water. The pastry should be just a little bit tacky when you touch it.
To test the dough for consistency, lightly pat together some dough the size of a tennis ball. If the ball crumbles apart or has lots of dry-looking cracks in it, the dough is still too dry; let it break apart. Add a drop or two of water to the outside of the ball and work it just a little. If it holds and feels firm and supple, mop up any remaining crumbs with the ball—if they pick up easily, the dough is probably wet enough. If they fall back into the bowl, you might need a touch more water to pull the dough together. The pastry should be just a little bit tacky when you touch it.
Dough can feel like it's holding together because the butter is melting. If at any point the dough ceases to feel cool to the touch or the butter pieces feel melty, soft, and warm, put the whole mixture in the freezer until it's cooled down again—about 10 minutes. It's impossible to gauge the water ratio accurately if the fat is melting into the flour.
For double crust, divide the dough into slightly uneven halves and shape each half into a ball—the larger of which will be for the bottom crust, the smaller ball for the top. Cover each ball tightly with plastic wrap and refrigerate it for at least half an hour to relax and slow the gluten development and rechill the fat. In practical terms, this cold rest makes the dough easier to roll out.
Monday, January 31, 2011
My Big Announcement
After agonizing for years, I made my final decision so quickly that I realized I haven't told many people yet:
I've enrolled in culinary school.
It was something I've wanted to do for awhile, but was always afraid I didn't have the money or the time. Neither of those circumstances have changed, but I decided if I was ever going to do it, I should jump in before we have a family and life gets even more complicated. So I took out student loans (I'm not going to say how much because it still freaks me out) and signed up for classes 9-5 on Saturdays and Sundays at the Institute of Culinary Education in New York City, while holding onto my full-time job.
I'm studying to get a diploma in baking and pastry. Maybe I can use it to open my dream cookie shop one day. Or it can help with my husband's idea of opening a Bed and Breakfast in Asbury Park. No matter what I end up doing with it, at least I won't have to wonder anymore if it's something that I should have done.
I just finished my second week of classes. We've done some simple things like make caramel, which just involved heating half a pound of sugar and 1/2 teaspoon lemon juice. Before it hardened we drizzled the hot liquid off the tip of a spoon to make designs like this caramel Saturn:
The second week our work got a little more complicated. We made apricot pectin candies called pate de fruits which I heard one of my classmates describe as a flavor explosion. Very accurate.
I'm not sure how I went from growing up to in a house where cakes came from mixes or the supermarket bakery to candying grapefruit rinds in class and making my own mayonnaise. I've always wondered if my parents had enjoyed food more, would I have known how much I love it from an early age and taken a different career path? I had no idea how wonderful food could taste - or there was more to eating out than Chinese restaurants - until I became an adult. But I've learned there is something magical about food that makes people happy and I am hoping to learn to tap into that magic.
And yes, I do get to bring home what I make in class and will share with everyone!
Thursday, January 27, 2011
Lower East Side Food Tour
My husband and I recently ended up on an impromptu mini food tour of New York's Lower East Side after a visit to the Tenement Museum. It was a freezing cold night so we ducked in some of the restaurants and food stores that were on a list I picked up at the museum on our way back to the subway.
Our first stop was Pickle Guys, which made me feel liked I was suddenly in a scene from the "Crossing Delancy." My husband has an inexplicable obsession with pickles and was very excited to try this place out, but sadly it had already closed by the time we showed up, a little after 6 p.m. So we will be heading back to the neighborhood soon to check it out.
Next we ended up outside Streits Matzo Company on Rivington Street. I peaked in the window and there were two men busy taking matzo from the oven and stacking them in baskets. I snuck a few shots with my camera before the cold air forced us to move on.
At this point we desparately needed some coffee and a spot to warm up so we ducked into Sugar Sweet Sunshine a few storefronts away. If I ever make good on my threat to open up a cookie shop, I'd want it to look a lot like this place. The cupcakes were tempting and I starred at the Pumpkin Triffle for a while dreaming of what it tasted like, but I was saving myself for what turned out to be a final and filling stop:
Yonah Schimmel Knishes on East Houston St, a short walk from Katz's Deli. Just our luck the place was about to close, but we convinced the man behind the counter to sell us a knish to go. He handed me a giant, round, heavy, pillow of potato happiness that was about the size of the well packed snowball. I starred longly at the tables before we left dreaming of what else could be on the menu of this east side relic to a era when people like my grandmother still went to the butcher, produce stand and baker to make dinner.
We ate our knishes walking back to the subway and decided we wouldn't need to eat dinner for a while.
I'm not surprised most of the places were closed by the time we got there - that is pretty typical for us. But I am anxious to recreate our tour a little bit earlier in the day when it's not so bitter cold.
Anyone want to join us?
Monday, January 10, 2011
A Blond(ie) Moment
I used to turn my noise up at blondies. I thought of them like brownies with a lot less chocolate.
What was the point?
But author Nick Malgieri changed my mind in his new cookbook "Chocolate" that I got as a Hanukkah present. He described blondies as a different take on the chocolate chip cookie, which I think is the most underrated, under appreciated baked good ever!
So maybe I was wrong. Especially since I was staring at a recipe that called for 12 ounces semi sweet chocolate chips, chopped walnuts dark brown sugar and lots of butter. What could there be in this recipe that isn't to like?
I ran out and bought a 10-15-x1 inch jelly- roll pan and made the blondies as a treat for New Year's. As soon as I cooled them, cut them up and saw how they were loaded with rich chocolate chips I knew I was in love!!! They were chewy and wonderful and easier to make than cookies because it didn't have to drop batter on trays, rotate in the middle of baking, and then refill for another batch.
I found a new favorite dessert. And based on the look on my husband's face, he was pretty happy with them, too! I guess gentleman do prefer blondies and now so do I!
Blondie Squares
Adapted from "Chocolate" by Nick Malgieri
2 1/2 cups all purpose flour
1/2 teaspoon salt
1 teaspoon baking soda
16 tablespoons (2 sticks) unsalted butter, softened
1 1/4 cup granulated sugar
3/4 packed dark brown sugar
2 large eggs
1 teaspoon vanilla
1/2 cup chopped walnuts
2 cups (12 oz) semi sweet chips
Set rack in the middle of the oven and set at 350 degrees. Butter one 10x15x1 inch jelly roll pan then line with buttered parchment paper.
In a mixing bowl stir together flour, salt and baking soda.
Beat butter with sugars until combined. Beat in eggs one at a time and then beat in vanilla.
Stir the flour mixture into the butter mixture, then stir in nuts and chips.
Spread batter in prepared pan (which takes a little effort to spread all the way to the edges) and bake for 30 minutes, until well risen and firm to the touch. Cool in pan on a rack.
After cake is cool, invert onto a flat surface, peel away paper and cut into two inch squares.
To store: keep in tin or plastic air tight container. Blondies can be individually wrapped and frozen in an closed plastic container.
Monday, January 3, 2011
Recipe for a Happy New Year
I received the best compliment from my mother on New Year's Day.
My family came over for dinner and I made cholent, a 15-hour stew usually served on the Sabbath that simmered overnight in my crockpot. I saved us from a dinner of pre-cut chicken coated with a seasoning packet that my mother had offered to make. It took longer hunting in the grocery store for some obscure ingredients (like cranberry beans that add a chestnut flavor) than it took to prep the stew before I went out to celebrate New Year's Eve.
I lined the crockpot with some chopped onions and potatoes cut into cubes. I cut up boneless beef short ribs that I bought in Whole Foods (where I found most of the other ingredients for the dish) and laid them on top. Next went in some beef broth, smoked paprika, molasses and an assortment of beans. I stirred the dish once before I went to sleep that night and added a little more water. By 7 a.m. the next morning the meat had completely fallen apart and blended in with the rest of the ingredients creating the perfect tender dish.
It sat in the fridge until I was read to reheat it for dinner. I served it with a side of kasha varnishkes, a childhood favorite of mine that I made from a Joan Nathan recipe I found online.
It was another wonderful dinner that took minimal effort and another successful dinner party at our house. After everyone at the table raved about the dish my mother came up to me and asked, half joking, "Where did you come from?"
I took the question as a compliment and an admission from the woman who rarely cooked. The answer is easy. I spent time pouring over cookbooks and cutting out recipes from cooking magazines. Now if I could only figure out where I am going. I love to cook and make people happy. I dream of going to culinary school and now my husband has put a bug in my ear about one day opening a bed and breakfast in Asbury Park, which seems like the perfect way to combine our love of entertaining and my love of cooking.
The future might not be so easy to figure out just yet. But at least I can be happy that I started out the New Year with a wonderful home cooked meal and a compliment from my mother, who didn't teach me how to cook but taught me a few other things about having fun.
Tuesday, December 14, 2010
'Tis the season for cookies!
I love to impress my friends with chewy cookies that are soft like marshmallows when they bite into them, but packed with deep rich flavor. Melting dark chocolate, adding instant espresso powder or grating fresh ginger are some of the secrets.
My cookie baking ritual started a few years ago when I used to have off the last week of the year. I was single and needed something to fill my time to keep me out of trouble – which meant obsessing over ex-boyfriends or shopping holiday sales with money I didn’t have.
I came across a Martha Stewart holiday cookie magazine, bought a couple of air bake cookie sheets, and an oven thermometer. I read up on the difference between Dutch processed and regular cocoa (Dutch processed has been treated with an alkali to neutralize its natural acidity so it doesn’t react with baking soda. As a result one can’t be substituted for the other).
I learned how to carefully spoon flour into measuring cups, the importance of leveling everything with a knife, and how to melt chocolate in a double boiler (I break up the chocolate in a metal mixing bowl and place it over a pan filled with ¼ inch of boiling water).
Before I start baking I build in an extra hour to bring the butter and eggs at room temperature. Some of the batters also require chilling time in the fridge or freezer. That is what gives them that impressive chewy goodness.
The other trick is making cookies that are simple but look impressive like the Martha Stewart Espresso Snowcaps.
The batter is left in the freezer for 45 minutes so it can be rolled into balls that are coated twice with powered sugar. When the bake they cracked giving it the appearance of snow caps on chocolate – in other words winter heaven. My chocolate chip cookies have chips and chunks in the batter which is chilled for about an hour. Peanut butter surprise cookies have both peanut butter in the batter and a mini peanut butter cup that gets pressed into the cookie halfway through baking.
So Happy Holidays everyone!!! My your next year be as rich as the deepest dark chocolate and as wonderful as a warm gingerbread cookie loaded with cloves that make your tongue tingle.
The batter is left in the freezer for 45 minutes so it can be rolled into balls that are coated twice with powered sugar. When the bake they cracked giving it the appearance of snow caps on chocolate – in other words winter heaven. My chocolate chip cookies have chips and chunks in the batter which is chilled for about an hour. Peanut butter surprise cookies have both peanut butter in the batter and a mini peanut butter cup that gets pressed into the cookie halfway through baking.
![]() |
| Photo from Martha Stewart |
Subscribe to:
Posts (Atom)


