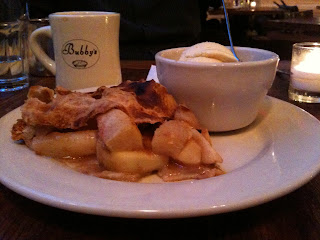
Part of my "studies" for Culinary School requires checking out some of New York City's best restaurants and bakeries to learn all the characteristics of what makes a good dessert.
Sounds too good to be true, right? But it was some of the first advice we were given in class: go visit some wonderful bakeries, bread shops and markets, talk to the owners, ask to see the kitchen and even ask if you can work there for a day to get experience.
It sounds like heaven to me!
So one of the first places I checked out was Bubby's Pie company in Tribecca. I had stumbled across "Bubby's Brunch Cookbook" by restaurant owner Ron Silver in a gift shop a few weeks before and couldn't wait to see the place.
We ended up there late in the afternoon - way past the brunch hour. So instead of trying Bubby's legendary sour cream pancakes we opted for the Mile High Apple Pie at the recommendation of our waitress. The balance of cinnamon, nutmeg and cloves and made it the best apple pie I've ever had. And the light flaky crust has the perfect degree of crispness. I was so impressed I bought another cookbook at the restaurant by the owner, "Bubby's Homemade Pies," and had it autographed by Silver.
BUBBY'S MILE HIGH APPLE PIE
From "Bubby's Homemade Pie's" by Ron Silver and Jen Bervin
The secret to make Bubby's pie “mile high” is to pile the apples higher than the tin. The apple's will cook down while baking but the crust remains sculptural, curvaceous, and high. Bubby's uses local Macouns apples from the farmer's market if available. The recipe suggests sautéing the apples in butter first.
Pastry for a 9-inch double-crust pie, chilled
3½ pounds apples
4 tablespoons (½ stick) unsalted butter
¾ cup sugar, plus extra for sprinkling on the top crust
3 tablespoons all-purpose flour
1 tablespoon fresh-squeezed lemon juice
1 teaspoon salt
1 teaspoon ground cinnamon
¼ teaspoon ground nutmeg
Pinch ground cloves
DIRECTIONS
Roll out the smaller batch of pastry and line a 9-inch pie tin with the bottom crust. Roll out the remaining large ball of dough for the top crust. Rechill the pastry if necessary.
Peel, core, and slice the apples ¼ to ½ inch thick (to get about 7 cups). In a large sauté pan, melt the butter and sauté the apples for 2 to 3 minutes, until the outer edges get slightly soft. Remove from heat. In the pan, measure the sugar, flour, butter, lemon juice, salt, cinnamon, nutmeg, and cloves on top of the apples, but do not stir until they are ready to go into the pie or they will get too soupy.
Preheat the oven to 450°F.
When you are ready to proceed, toss the apples with the other filling ingredients. Because this pie is so tall, mounding up the apples takes a little finesse. Scrape the apple filling into the bottom crust until the pie reaches average height, then add the remaining apples by the handful, using your free hand to steady the mound.
Cover it with the second crust. Trim and crimp the crust; chill the pie for 10 minutes in the freezer. Cut vent slits in the top crust and sprinkle it very lightly with water and then sugar. Because the top crust slope is so steep, you need to flick a little water at it to keep the sugar from rolling off and caking at the crust edge when you sprinkle it on.
Bake the pie on a lipped baking sheet for 10 minutes, or until the crust looks dry, blistered, and blonde. Turn the oven down to 375°F, and bake for at least 30 minutes more, or until the crust is golden brown and visible juices are thickened and bubble slowly through slits in the top crust. With a pie this high, you can expect some runoff on the tray. Test apples for doneness by poking a wooden skewer down through the open vent slits of the top crust. Apples inside should yield to the skewer with slight resistance—cooked through but not mushy. Look for thick slow bubbles where the juices pool near the edge of the crust.
Cool the pie completely before cutting, at least a few hours. Serve it at room temperature. Store the pie uncovered at room temperature, up to 3 days.
Bubby's All Butter Pastry Dough
From "Bubby's Homemade Pies"
Bubby's All Butter Pastry Dough
From "Bubby's Homemade Pies"

sounds so good, even though i'm not much of an apple pie fan..
ReplyDeleteCool. No pie beats a good apple pie. I'm wondering, though, is this Ron Silver the ACTOR Ron Silver or someone else entirely?
ReplyDelete